
How to make changes in a group of nodes using Ansible?
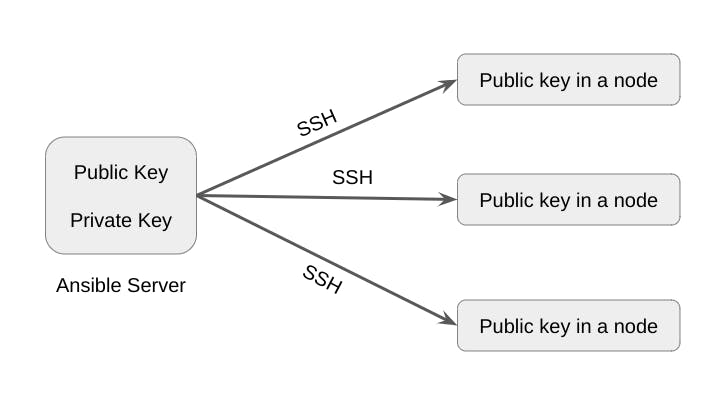
Connect one master node with multiple worker nodes.


In the previous blog, I discussed what is ansible and when it is used in the industry but in this blog, I will be showing you that how you can create instances in your AWS account and take one as an ansible server and other as the worker nodes and build a connection b/w them.
The Ansible server contains the ansible packages and the updates will be given to the nodes after connection.
Let's take a look at the steps that how you can create the ansible and the nodes.
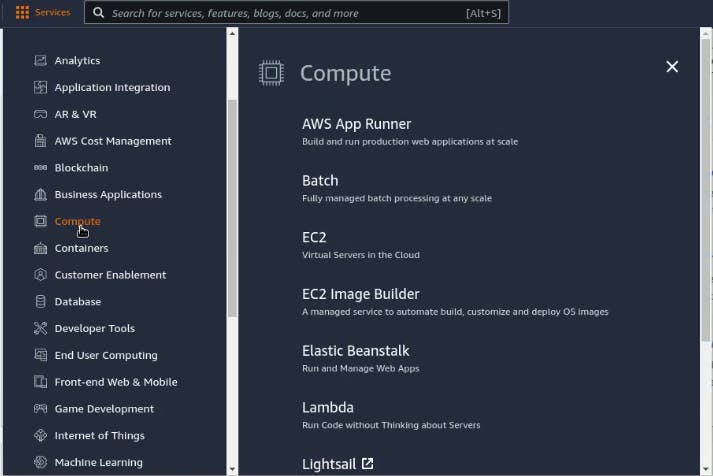
- First create an AWS account and then go to the services on the upper left side. Click on the compute and then click on EC2.
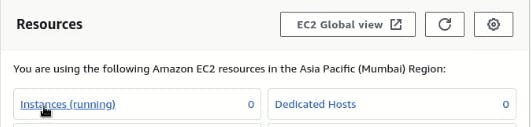
- Once you click on the EC2, it will lead you to another page in which you have to click on the Instances(Running) option.
- After that, another window will open, and then click on the Launch instance option in the upper right corner of the page.

- After that, give a tag name, then change the number of instances to 3.
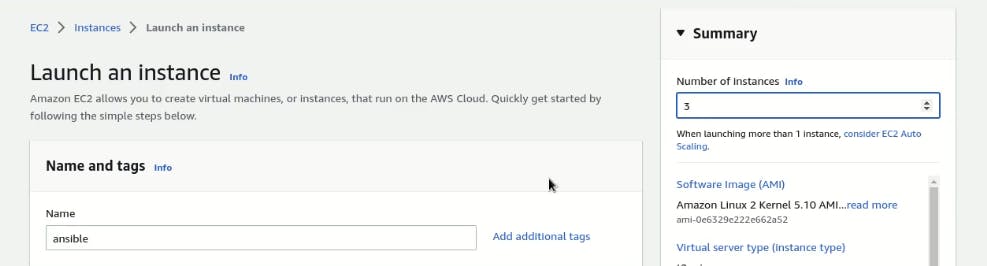
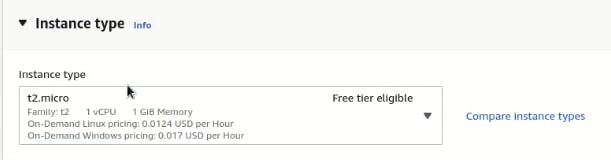
- Leave the Applications and OS images to Amazon and the instance would be t2.micro by default.

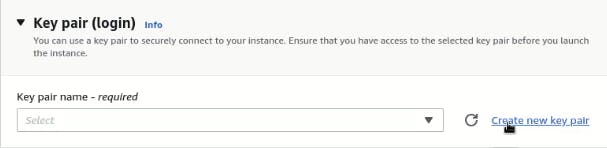
- Now Scroll down and create a new key pair.
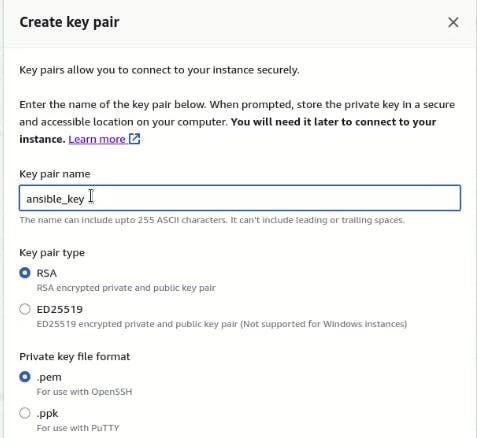
- If you click on the create a new key link, it will lead you to another page, in which you just need to write the key pair name, leave other details as it is, and then click on the create key pair button. After clicking, it will download a file into your system that will be used further.
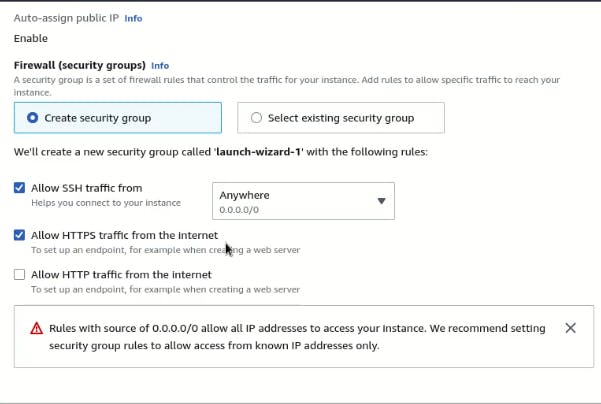
- Further, scroll down in the network settings and click on create a new security group. Check the SSH and HTTP boxes. Leave the IP to Anywhere just for testing purposes.
- Leave the configure storage option as it is. Scroll down, click on the advanced details option and go to the end to write the following data in the user data.
#!/bin/bash
sudo su
apt update -y

- Click on the launch install button on the right side and then click on the view instances button. It will create three instances for you.
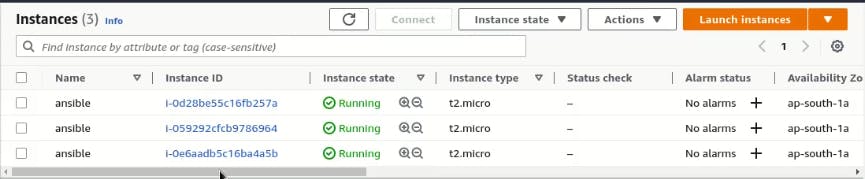
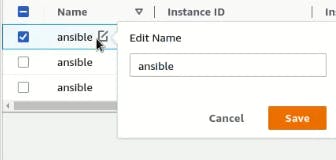
- After launching the instances, change their names. One would be an Ansible_server and the other two would be Node1 and Node2. Click on the pencil to change the names of each instance and then click on the save button to save them.
Now open the ec2 instances one by one in the local machine by using SSH. To do this, first, open three tabs in a terminal and then go to the Downloads directory or another directory in which the ansible-key-file.pem is present.
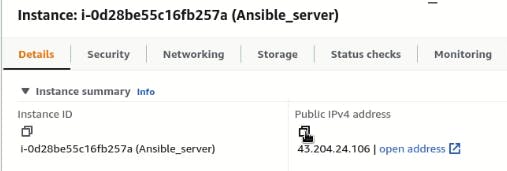
Click on the Ansible_server option in AWS and copy the public IP address. Once the IP is copied, open the first tab of the terminal and write the
ssh ec2-user@<public-ip-address>command. It will give you the option to write YES or NO. Type yes and it will give you a Permissions 0664 for 'ansible-key-file.pem' message
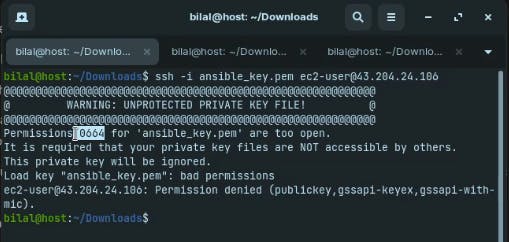
- To counter this error, change the permission by writing
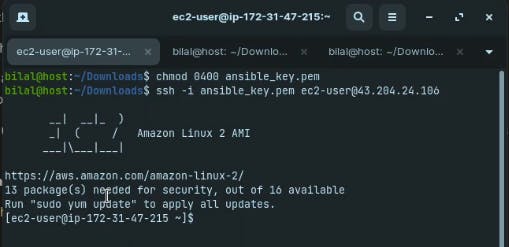
chmod 0400 ansible-key-file.pemcommand in the terminal and again writessh -i <ansible-key-file.pem> ec2-user@<public-ip-address>. It will give you access to the first node(Ansible_server).
You can get out of the node in the terminal by writing
exitand run it again by writingssh -i <ansible-key-file.pem> ec2-user@<public-ip-address>.Do the same thing with the other two nodes also and then go back to the first node again which is the Ansible_server and make it a root user by writing
sudo su.Then download the ansible package by writing
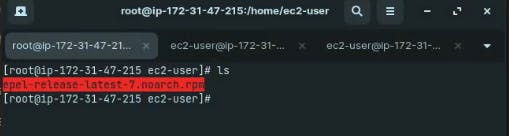
wget http://dl.fedoraproject.org/pub/epel/epel-release-latest-7.noarch.rpmType the
lscommand and it will show you the ansible package that is downloaded.
Then install the file that you have downloaded by writing
yum install downloaded-file-name. It will ask you for the YES or NO option. Type yes in order to execute it.After that, type
yum update -yand it will update your machine.Now install these packages by typing the command
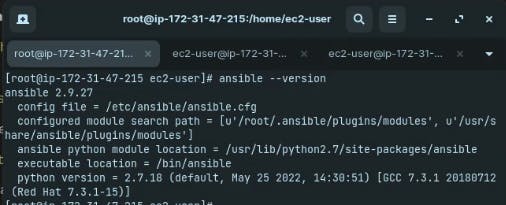
yum install git python python-pip openssl ansible -y.After downloading the packages, type
ansible --versionto check the version of Ansible in your Ansible_server node.
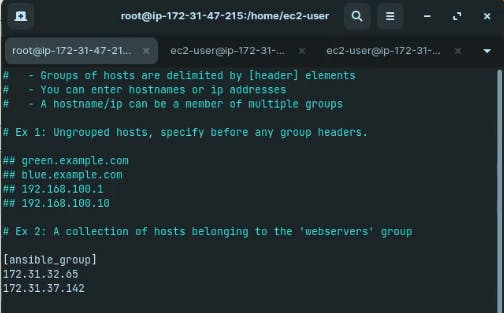
- Now go to the hosts' file inside the ansible server by writing vi /etc/ansible/hosts and copy the private IP address of node1 and node2 and paste them below the group that you will write. In this way, the record of each node will be saved inside the ansible server.
[any-group-name]
<private-ip-of-node1>
<private-ip-of-node2>
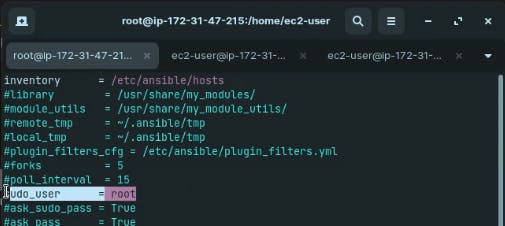
- The hosts' file will only work if the
/etc/ansible/ansible.cfgfile is updated by uncommenting some of the following data. Writevi /etc/ansible/ansible.cfgand then uncomment the data and it will be activated and run successfully.
inventory = etc/ansible/hosts
sudo_user = root
Create a user
Change all the nodes' to root by writing
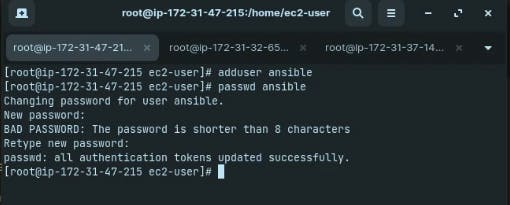
sudo su.Once all the nodes are changed to root, create a user in all three instances by typing
adduser <username>. Type any username that you want to add. In my case, I have given ansible.Now set the password of the ansible user that you have added by typing
passwd ansibleand it will give you the option to enter the password and confirm the password.
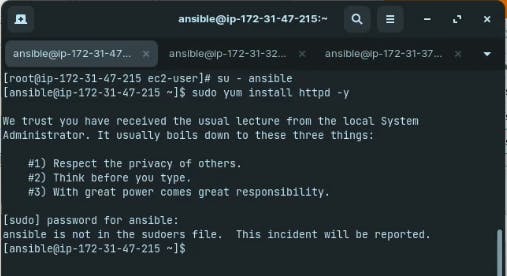
Add the user in the other two instances also and then move from the root to the ansible user by typing
su - ansiblein all three instances.If you want to install a package like
sudo yum install httpd -yin the Ansible_server node, it will ask you for the password but still not download the package because you don't have the root privileges.
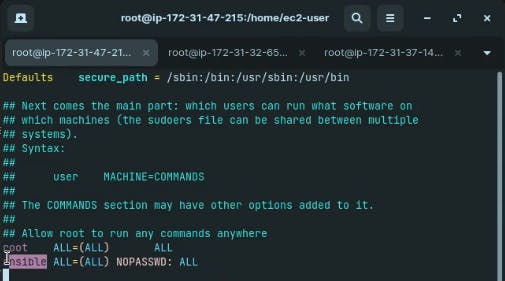
Exit from all three nodes by typing
exit. You will be present as a root user. Now typevisudoin all three instances.It will ask open a file for you in which you need to add the following things.
Allow root to run any commands anywhere
root    ALL=(ALL)        ALL
ansible ALL=(ALL) NOPASSWD: ALL
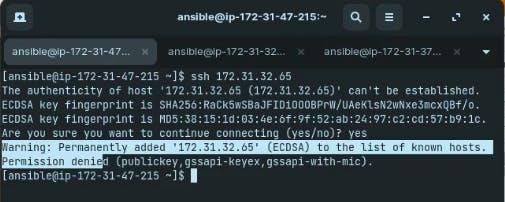
Once you update it in all three instances then become an ansible user again by typing
su - ansiblein all the instances.Now go to the Ansible_server and install the httpd package as an ansible user by writing
sudo yum install httpd -y.After installing the package, establish a connection b/w the Ansible_server and the Node1 and Node2. Go to the Ansible_server and type
ssh <node1-private-ip-address>andssh <node2-private-ip-address>to build the connection b/w them.It will give you the permission denied message.
- Now we have to do some changes in the sshd_config file in all three instances. Go to the root server by typing exit in all the instances and open the
/etc/ssh/sshd_configfile by writingvi /etc/ssh/sshd_configand uncomment and comment the following data.
PermitRootLogin yes
PasswordAuthentication yes
#PasswordAuthentication no
Once the three instances files are updated, then restart all the instances by typing
service sshd restart.Now become an ansible user by typing
su - ansiblein all the instances and then typessh <node1-private-ip-address>andssh <node2-private-ip-address>to get access to the node1 and node2 from an Ansible_server.It will ask you for your password and after that, it will give you access to the particular node.

If you create a file in the Ansible_server tab, then you go to a node tab that is accessed by the ansible server, and there you type
ls, you will see that the file is created in that particular node.If you want to get out of the node, you can type exit.
Solve a password problem that gets asked every time
If there are few nodes, then it won't be hard to give the password but if there are hundreds of nodes connected to the Ansible_server and if you're switching constantly then it will become very annoying to enter the password every time.
To solve this problem, we would prevent the password to get asked every time.
We will generate a public key in the Ansible_server and that key will be given to all the nodes to authenticate it and there will be no need to ask for a password every time.
This is a trust relationship. It means that the root only will make a relationship with the root and an ansible user will only make a relationship with the ansible users and that's why you have to be the ansible user on all the nodes to access other nodes by typing
su - ansible.Create a key by running this command
ssh-keygenas an ansible user in the Ansible_server. Don't fill in the detail. Instead, press the enter button multiple times.
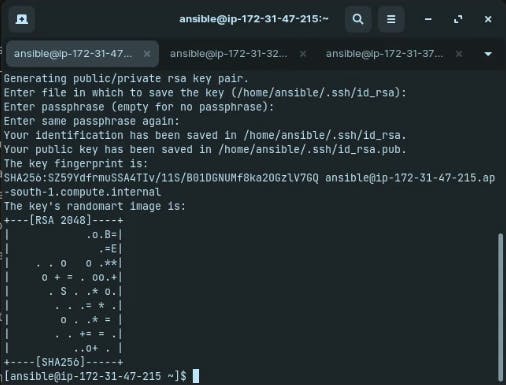
Now find the hidden files by typing
ls -aand you will get the .ssh directory.Type
cd .sshand it will lead you inside the ssh directory.Type 'ls' and it will give you id_rsa, id_rsa.pub, and known_hosts files that contain the private, public, and hosts.

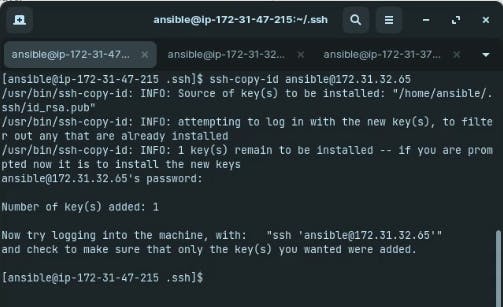
- Now copy the public key file in both the nodes by typing
ssh-copy-id <node1-username>@<node1-private-ip>andssh-copy-id <node2-username>@<node2-private-ip>. It will ask the password for the last time.
Now verify and go to the ansible user by going backward from the ssh directory by typing
cd ..and then typing,ssh <node1-private-ip>orssh <node2-private-ip>.You will get into the node without the password being asked.

- Type exit to get out of the node.
What if you want to make changes in a few nodes or a group of nodes?
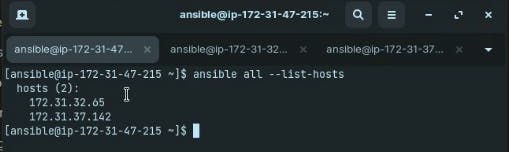
First switch to the ansible server by typing
su - ansible.Then type
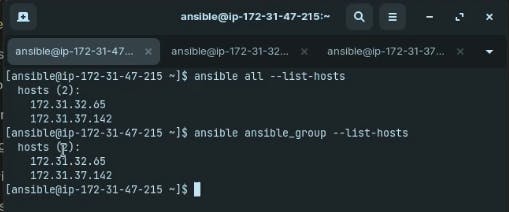
ansible all --list-hostsand it will give you a list of all the nodes that are connected to the ansible server.
- Type
ansible groupname --list-hosts. It will give you a specific group name that contains the nodes.
The node ascending order representation starts from 0 to so on and the descending order representation starts from -1 to so on.
ansible
<groupname>[0] --list-hostswill give the first node of a particular group.ansible
<groupname>[1:4] --list-hostswill give the details from node 2 to node 5 of a particular group.The details of multiple groups can be shown by using a colon in between like
<groupname1>[1:3]:<groupname2>[4:3].

If you also want to check the DevOps best practices then this article will definitely help you.
Conclusion
First I showed you how you can create the instances and then how to connect them in the terminal. Then I show you how you can create a user and build a connection with b/w the nodes. After that, I showed you how you can solve a problem so that password is not asked from you every time.
That's it.
You can follow me on YouTube, Twitter, and LinkedIn.
Thank you for reading, and I hope you enjoyed this article as much as I did.
#WeMakeDevs #devops #ansible #aws