How to Implement JWT-based authentication in Golang?
Generating a token, saving it in the cookie, and refreshing it after some time.
What is JWT?
JWT, or JSON Web Token, is an open standard used to share security information between two parties — a client and a server. Each JWT contains encoded JSON objects, including a set of claims. They are commonly used by developers in their APIs.
JWT is popular because:
- A JWT is stateless. That is, it does not need to be stored in a database, unlike opaque tokens. This in turn means it doesn’t remember your last request was authenticated, but instead it requires you to send the token on each request.
- The signature of a JWT is never decoded once formed, thereby ensuring that the token is safe and secure.
- A JWT can be set to be invalid after a certain period of time. This helps minimize or totally eliminate any damage that can be done by a hacker, in the event that the token is hijacked.
In this tutorial, I will demonstrate the creation, use, and invalidation of a JWT using Golang.
Requirements
The following softwares need to be installed before working on JWT.
- Golang. You can download it from this website.
- JWT. You can install it by typing
go get -u github.com/golang-jwt/jwt/v4in the terminal.
What is the JSON Web Token structure?
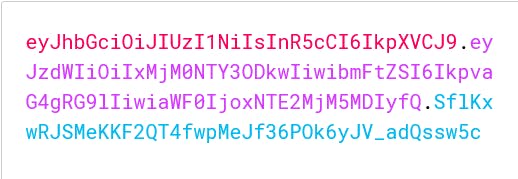
In its compact form, JSON Web Tokens consist of three parts separated by dots (.), which are:
- Header
- Payload
- Signature
Therefore, a JWT typically looks like the following.
xxxxx.yyyyy.zzzzz
Let's break down the different parts.
Header
The header indicates the token’s type and which signing algorithm has been used. It typically consists of two parts: the type of the token, which is JWT, and the signing method/algorithm being used, such as HMAC SHA256 or RSA.
Here are the most common signing methods:
- The HMAC signing method (
HS256,HS384,HS512) expects[]bytevalues for signing and validation. - The RSA signing method (
RS256,RS384,RS512) expects*rsa.PrivateKeyfor signing and*rsa.PublicKeyfor validation. - The ECDSA signing method (
ES256,ES384,ES512) expects*ecdsa.PrivateKeyfor signing and*ecdsa.PublicKeyfor validation.
For example
{
  "alg": "HS256",
  "typ": "JWT"
}
Then, this JSON is Base64Url encoded to form the first part of the JWT.
Payload
The second part of the token is the payload, which contains the claims. Claims comprise of the application’s data( email id, username, role), the expiration period of a token (Exp), and so on. There are three types of claims: registered, public, and private claims.
Registered claims: These are a set of predefined claims which are not mandatory but recommended, to provide a set of useful, interoperable claims. Some of them are: iss (issuer), exp (expiration time), sub (subject), aud (audience), and others.
Public claims: These can be defined at will by those using JWTs. But to avoid collisions they should be defined in the IANA JSON Web Token Registry or be defined as a URI that contains a collision-resistant namespace.
Private claims: These are the custom claims created to share information between parties that agree on using them and are neither registered nor public claims.
An example payload could be:
{
  "sub": "1234567890",
  "name": "John Doe",
  "admin": true
}
The payload is then Base64Url encoded to form the second part of the JSON Web Token.
Signature
It is generated using the secret (provided by the user), encoded header, and payload.
For example, if you want to use the HMAC SHA256 algorithm, the signature will be created in the following way:
HMACSHA256(
  base64UrlEncode(header) + "." +
  base64UrlEncode(payload),
  secret)
The signature is used to verify the message wasn't changed along the way, and, in the case of tokens signed with a private key, it can also verify that the sender of the JWT is who it says it is.
Putting all together
The output is three Base64-URL strings separated by dots that can be easily passed in HTML and HTTP environments while being more compact when compared to XML-based standards such as SAML.
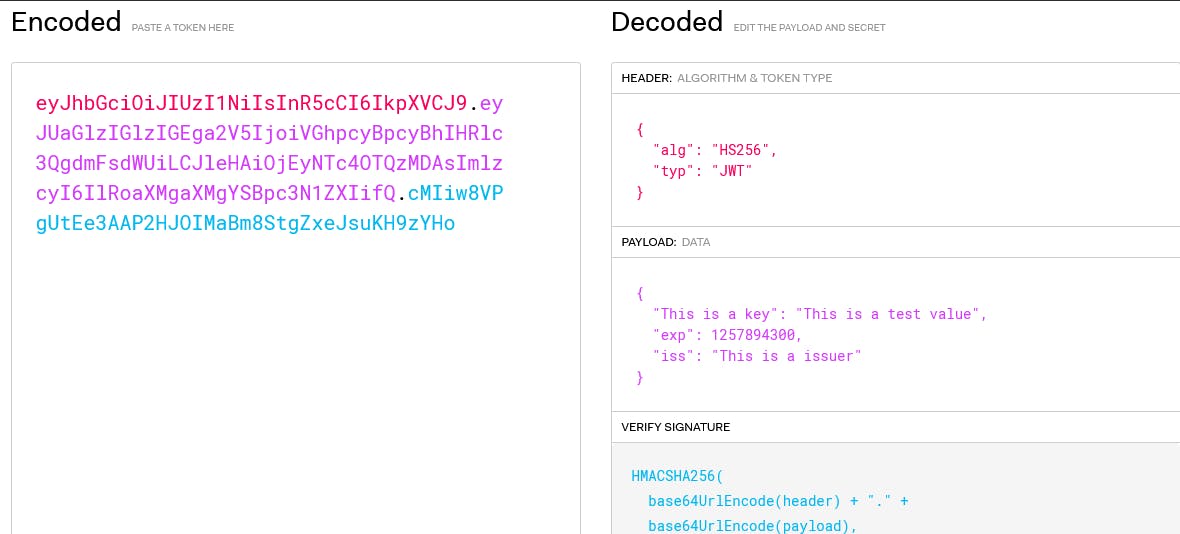
The following picture shows a JWT that has the previous header and payload encoded, and it is signed with a secret.

Token Types
Since a JWT can be set to expire (be invalidated) after a particular period of time, two tokens will be considered in this application:
Access Token: An access token is used for requests that require authentication. It is normally added in the header of the request. It is recommended that an access token has a short lifespan, say 15 minutes. Giving an access token a short time span can prevent any serious damage if a user’s token is tampered with, in the event that the token is hijacked. The hacker only has 15 minutes or less to carry out his operations before the token is invalidated.
Refresh Token: A refresh token has a longer lifespan, usually 7 days. This token is used to generate new access and refresh tokens. In the event that the access token expires, new sets of access and refresh tokens are created when the refresh token route is hit (from our application).
Where to Store a JWT?
For a production-grade application, it is highly recommended to store JWTs in an HttpOnly cookie. To achieve this, while sending the cookie generated from the backend to the frontend (client), an HttpOnly flag is sent along with the cookie, instructing the browser not to display the cookie through the client-side scripts. Doing this can prevent XSS (Cross-Site Scripting) attacks.
JWT can also be stored in browser local storage or session storage. Storing a JWT this way can expose it to several attacks such as XSS mentioned above, so it is generally less secure when compared to using "The HttpOnly cookie technique".
Implementation
Generate a JWT token
package main

import (
  "fmt"

  "github.com/golang-jwt/jwt"
)

type MyCustomClaims struct {
    AnyString string `json:"This is a key"`
      jwt.StandardClaims
}

var Claims = &MyCustomClaims{}

// GenerateJWT generates token and returns string and error
func GenerateJWT() (string, error) {
  // Write the secret key and convert it into byte value.
  mySecretKey := []byte("SecretKey")
  // Set the 5 minutes expiration time limit
  expirationTime := time.Now().Add(5 * time.Minute)

  // Create the Claims
  claims := MyCustomClaims{
        "This is a test value",
        jwt.StandardClaims{
            ExpiresAt: expirationTime.Unix(),
            Issuer:    "This is a issuer",
        },
   }

  // Declare the token with the algorithm used for signing and the claims
  token := jwt.NewWithClaims(jwt.SigningMethodHS256, claims)
  // Create the JWT string
  tokenString, err := token.SignedString(mySecretKey)
  return tokenString, err
}
Define a struct that contains a string and the
jwt.StandardClaims. Make that struct equal to Claims variable.Make a
GenerateJWT()function and return the string and error.Use a secret key in the claims. You can use anything you want. You can create a specific function to store the key in another file that will be used further.
Set the 5 minutes limitation time. It means that the token will expire after every 5 minutes.
Make
MyCustomClaimsthat will contain the key and thejwt.StandardClaimsThe
jwt.StandardClaimsstruct contains useful fields like expiry and issuer, subject, etc. It will operate with third-party or external applications. Here an expiration time shows the "Time after which the JWT expires" You can see a full list of registered claims at the IANA JSON Web Token Claims Registry.
The jwt-go package has a function called
NewWithClaimsthat takes two arguments.Signing methods such as HMAC256, RSA, and so on. All a signature does is ensure that the message is authentic, which it achieves by allowing the recipient to compare the data they’ve received with a trusted claim included in the data (the signature). You can know more about it in this article.
Claims map. It's a map with claims such as private (here username) and reserved (issued at).
token.SignedString()will sign and get the complete encoded token as a string and then return it.After running the above code, the following cookie value was printed out.
eyJhbGciOiJIUzI1NiIsInR5cCI6IkpXVCJ9.eyJUaGlzIGlzIGEga2V5IjoiVGhpcyBpcyBhIHRlc3QgdmFsdWUiLCJleHAiOjEyNTc4OTQzMDAsImlzcyI6IlRoaXMgaXMgYSBpc3N1ZXIifQ.cMIiw8VPgUtEe3AAP2HJOIMaBm8StgZxeJsuKH9zYHoAfter running this cookie in the JWT website, I got the following result.

Save a Token in the Cookie
// Make TokenInCookie() function and returns a string and boolean
func TokenInCookie(expirationTime time.Time) (string, bool) {
    tokenString, err := GenerateJWT()
    if err != nil {
        log.Fatal(err)
    }

    // Set the cookie in the browser
    http.SetCookie(w, &http.Cookie{
        Name:      "Token",
        Value:      tokenString,
        Expires:    expirationTime,
        HttpOnly:   true,
    })

    // Use the secret key to parse claims
    mySecretKey := []byte("SecretKey")
    token, err := jwt.ParseWithClaims(tokenString, Claims, func(token *jwt.Token) (interface{}, error) {
        return mySecretKey, err
    })

    if token.Valid {
        return tokenString, true
    } else {
        return "", false
    }
}
Create a
TokenInCookie()function, take a token fromGenerateJWT()function and store it in the cookie.Use the
http.SetCookieto store the name, value, and expiration time in the browser.Function
jwt.ParseWithClaimsparse a JWT with custom claims and accept an interface of jwt.Claims as the second argument.After parsing the token, it will check its validity.
Refresh a Token in the Cookie
// RefreshToken renews the token after every 5 minutes
func RefreshToken() {
    // Generate a new token 30 seconds before the expiration time
    if time.Until(time.Now().Add(time.Duration(Claims.ExpiresAt))) > 30*time.Second {
        fmt.Println("Error")
        return
    }

    tokenString, ok := TokenInCookie(time.Now().Add(5*time.Minute))
    if ok {
        // Store the token in the Redis for the further login process.
        fmt.Println("Here is the new token", tokenString)
    }
}
RefreshToken()update the token with a new one inside the cookie so that a hacker does not access it.time.Until()is used so that the token is replaced 30 seconds before the time.TokenInCookie()is used that will set the token in the cookie for the next 5 minutes.if-statementwill check the validity of the token and give us a success message.You can use the
TokenInCookie()inside the login function so that if somebody logs in, then the token will automatically be generated.Use the
RefreshToken()function inside the home function so that the token is refreshed once the 5 minutes are passed.
